Hairline lines creeping across a freshly painted ceiling, a faint ridge along a bedroom wall, or a crack shadowing the corner of a door frame: these are usually not “bad plasterboard”, but rushed jointing showing itself a few months on. Plasterboard will often crack later when joints have been taped, filled or skimmed too quickly, or without proper drying and support. The core issue is simple: movement plus weak joints. If the boards move slightly and the joint is not strong and flexible enough, the crack will telegraph straight through your paint.
Why rushed plasterboard joints crack later
When plasterboard is first fitted, it is still “settling” with the building. In a UK home, heating coming on in autumn, a new loft conversion drying out or a reboarded bathroom warming and cooling each day all cause tiny movements in the structure.
If the jointing has been rushed, those movements are enough to open a line.
Common ways rushing causes later cracks:
- No or poor joint tape: Just filling the gap with compound or plaster leaves a weak, brittle bridge. Any movement, and a hairline appears.
- Too much compound in one go: Thick, heavy layers shrink as they dry. If they have been slapped on in a single pass, they can pull away and crack.
- Not letting each coat dry: Skimming or painting over damp joint compound traps moisture. As it dries underneath, it shrinks and fine cracks show through.
- Boards not properly fixed: If screws are too far apart, not tight enough, or miss the stud, the board can flex. A flexing board will almost always crack at the joint.
- Gaps and mismatched edges: Large gaps between boards, or tapered joined to square edges without care, leave weak spots that open later.
In many UK rooms you see this around loft hatches, stairwell ceilings, chimney breasts and above door frames, where movement is greatest.
What you can safely check at home
Before blaming the plasterboard itself, there are a few low-risk checks you can do without ripping anything down.
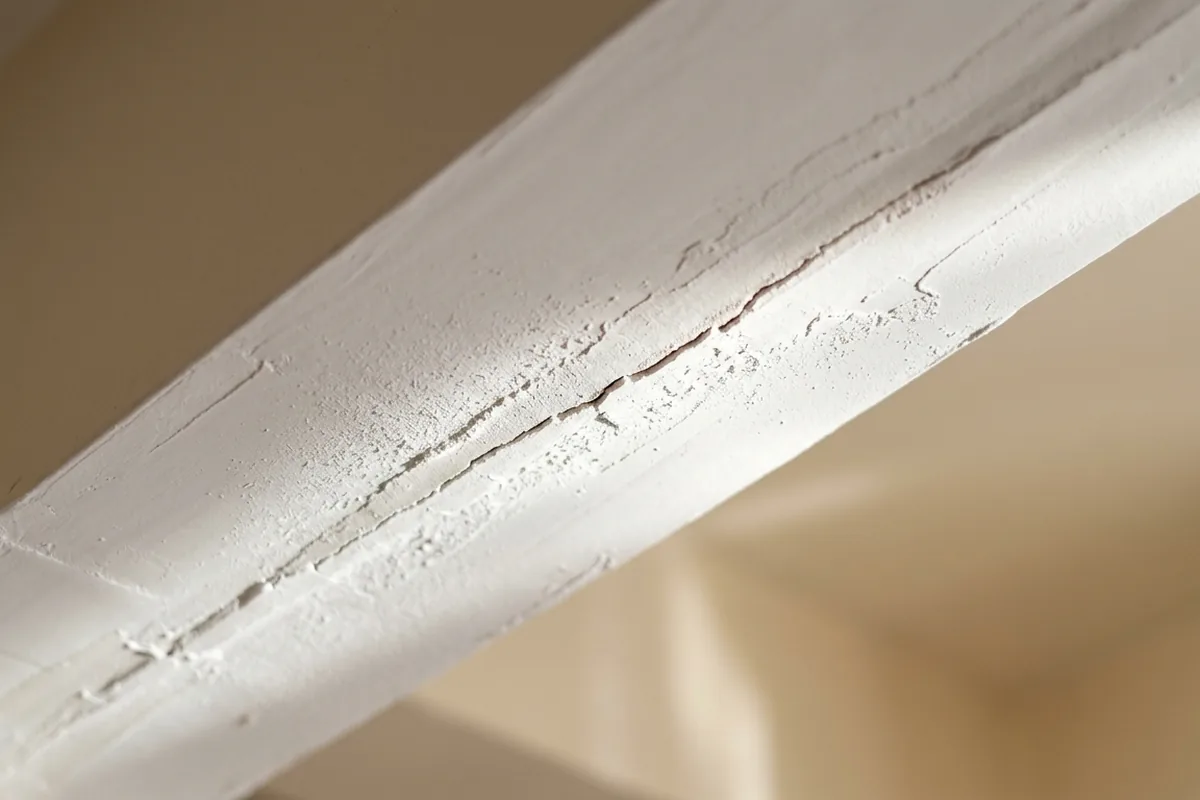
Stand back and look at the pattern of cracks. A rushed joint usually shows as:
- Very straight, very fine lines along where two boards meet.
- Cracks that follow a screw line or run in a neat grid on a ceiling.
- A slight ridge or hollow you can feel with your fingertips along the line.
If you can safely reach (step stool on a level floor, no stretching), run your fingers gently across the crack. If you can feel tape just under the paint and the surface is mostly firm, the joint is there but may have been skimmed or dried badly. If it feels crumbly, the tape may be missing or poorly bedded.
You can also look for:
- Popped screws: small circles where filler has lifted or a screw head is just visible. That suggests movement in the board.
- Cracks that widen where a ceiling meets a wall. That can be a mix of building movement and a stiff, poorly reinforced corner joint.
If the crack is wider than a credit card, if the surface feels loose over a larger area, or if doors are suddenly sticking and floors feel uneven, this may be more than a cosmetic joint issue and you should speak to a qualified builder or surveyor, not keep filling.
How to avoid and deal with cracking joints
For new work, the aim is to give the joint a strong spine and let everything dry in its own time. For existing hairlines, the aim is to avoid making the weakness worse.
If you are having new plasterboard fitted
You do not have to do the work yourself, but you can ask the right questions or spot cutting corners:
- Are they using tape on every joint? Paper or mesh tape should be bedded into joint compound, not just skimmed over.
- Are screws close enough together? Typically every 150–200 mm on ceilings, a bit wider on walls, with screws slightly dimpled, not breaking the paper.
- Are they allowing drying time? Each coat of compound should dry fully before the next, and before painting. In a cold, damp terraced house this can take longer than a day.
- Is the room ventilated and gently heated? Blasting the heating or a fan heater at fresh joints can cause rapid drying and shrinkage cracks.
Rushing these stages may make the job look finished faster, but you often pay for it later with lines across your newly painted lounge ceiling.
If you already have fine cracks
For hairline, straight cracks that clearly follow a joint, you can often tidy them up yourself:
1. Lightly score or widen the crack with a sharp knife or corner of a scraper so filler has something to grip, but do not gouge deeply.
2. Dust off with a dry brush or microfibre cloth.
3. Apply a flexible filler suitable for plasterboard joints, pressing it well into the crack.
4. Smooth it flush, let it dry fully, then sand lightly and touch up with paint.
If the same crack keeps coming back in the same place, the underlying joint may be weak or the boards may be moving more than they should. At that point, a better fix is often to:
- Cut back to the tape,
- Re‑tape and re‑joint properly,
- Or in stubborn cases, have a plasterer over-skim the area.
Avoid loading thick plaster over a suspect joint in one go. Heavy skim over a weak base nearly always cracks again.
If the ceiling is high, access is awkward, or you are unsure what is behind the boards (especially in older properties where there could be lath and plaster, or services running close), it is safer to get a professional in rather than cut or pry at the surface.
A good sign you are winning is simple: after a full heating season, the line has not reappeared and the ceiling or wall still looks flat under side light from a window.