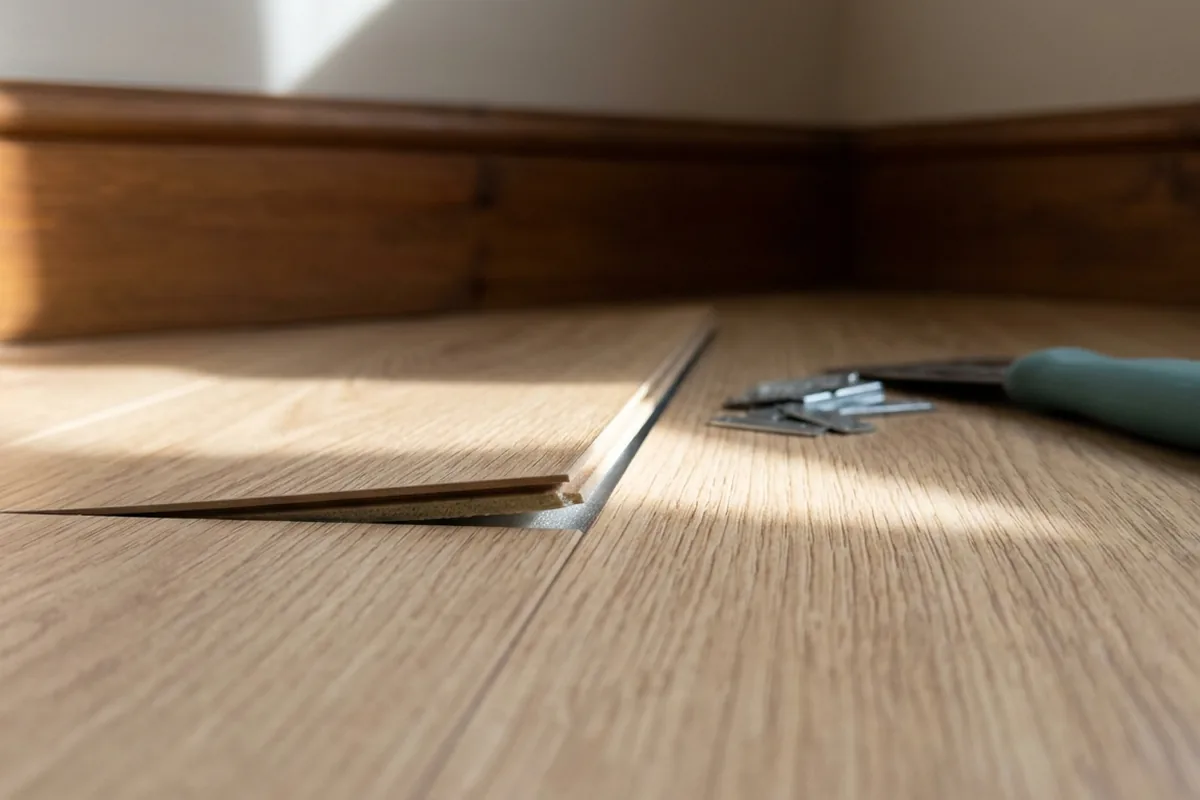
Those first tiny ridges in a new laminate floor, or a board that clicks underfoot near the sofa, usually mean one thing: something wasn’t quite right when it was laid. To stop boards lifting later, you need a flat, dry base, the right expansion gaps and joints locked together properly. If the subfloor is uneven, damp or the boards are jammed hard against the skirting, they will often bow, peak or separate within months.
The key to laminate that stays flat
The main reasons laminate lifts are simple: uneven subfloor, no expansion gap, wrong underlay or boards not fully clicked together. Getting these right at the start matters more than any fancy tool.
Before you even open the packs:
- The subfloor (concrete or floorboards) should be flat within about 2–3 mm over 2 m.
- Moisture on concrete must be under the level stated by the flooring manufacturer.
- The room should be dry and roughly at normal living temperature.
If the floor is badly out of level, use a self-levelling compound on concrete or fix/plane/overboard timber. Laying laminate over dips and humps is the quickest way to get creaking and lifted joints.
A simple laying order that prevents lifting
1. Acclimatise the boards
Leave the unopened packs in the room for 48 hours so they adjust to the temperature and humidity. Skipping this can lead to boards expanding after fitting and pushing upwards.
2. Prepare the subfloor properly
Vacuum thoroughly. Fix any loose floorboards and punch down raised nail heads. On concrete, repair cracks and high spots. Fit a damp-proof underlay if needed (check the packaging; many underlays for concrete include a built-in DPM).
3. Plan your layout
Measure the room so you’re not left with a final sliver of board by the hallway door. Aim for the last row to be at least 5–6 cm wide. Stagger end joints by at least 30 cm so you don’t get a weak line.
4. Leave a proper expansion gap
Around the entire edge, leave 8–10 mm between the laminate and walls, pipes, doorframes and hearths. Use spacers against the skirting or walls while you work. Without this gap, boards expand and peak upwards along the joints.
5. Click joints together cleanly
Follow the direction arrows on the pack. Angle the tongue into the groove and click in one movement. If a board won’t sit down, check for a chip, bit of underlay or dust in the groove. Use a tapping block designed for laminate, never hammer the board edge directly.
6. Check each row as you go
Every few boards, step back and look along the joints. Any tiny raised edge now will be a full ridge later. Lift and refit the joint while it’s easy, rather than forcing the next row to match it.
7. Finish edges without pinning the floor
Once the spacers are removed, the skirting or beading should sit on top of the laminate, not screwed through it into the floor. Anything that fixes the laminate solidly to the subfloor can stop it moving and cause lifting elsewhere.
What to check in your room before you start
Different UK homes throw up different problems: chilly concrete floors in a 1960s semi, bouncy floorboards in a terraced house, or a small rented flat with mystery lumps under the old carpet.
Before buying anything, look at three things: subfloor type, moisture and room size.
| Situation | Likely issue | What to do first |
|---|---|---|
| Cold concrete ground floor | Moisture and heat loss | Use underlay with built-in DPM and check for damp patches |
| Old floorboards upstairs | Movement and squeaks | Fix loose boards, screw down, consider 6 mm ply overboarding |
| Small box room | Over-tight fitting | Expansion gap all round, don’t wedge tightly under door frames |
| Long narrow hallway | Expansion along length | Follow manufacturer’s max run length, use expansion joint if needed |
If you’re on concrete and you suspect any damp (dark patches, musty smell, cold “sweaty” feel), do not lay laminate until it’s checked. A basic moisture test kit from somewhere like Wickes or Screwfix is cheap compared with replacing a whole floor that swells and blows within a winter.
On timber, walk the room in soft shoes and listen. Creaks or movement need sorting first: tighten with screws, not nails, and plane or sand obvious high spots. In some cases, fixing thin plywood over the boards gives a smoother, more stable base.
Laminate mistakes that cause lifting months later
The annoying thing with laminate is that many problems show up after you’ve moved the furniture back in. A few common habits are worth avoiding.
Laying straight onto old underlay or carpet
Laminate needs a firm, even base. Old foam underlay or carpet will compress and move, which can pop joints and cause ridges.
No gap at the door threshold
Where laminate meets tiles or carpet at a doorway, you still need an expansion gap under the threshold strip. If the strip is screwed too tightly down, the boards can’t move and may lift in the middle of the room instead.
Running too far without a break
Most manufacturers give a maximum distance you can run laminate in one direction before you need an expansion joint (often around 8–10 m, but check your pack). In long open-plan spaces, ignoring this can lead to boards rising slightly along a line.
Trapping the floor with heavy built-ins
Kitchens are the classic one. Laminate usually shouldn’t run under very heavy fixed units or islands because it stops the floor floating properly. Fit laminate up to the plinth line, not under the carcasses, unless the manufacturer specifically allows it.
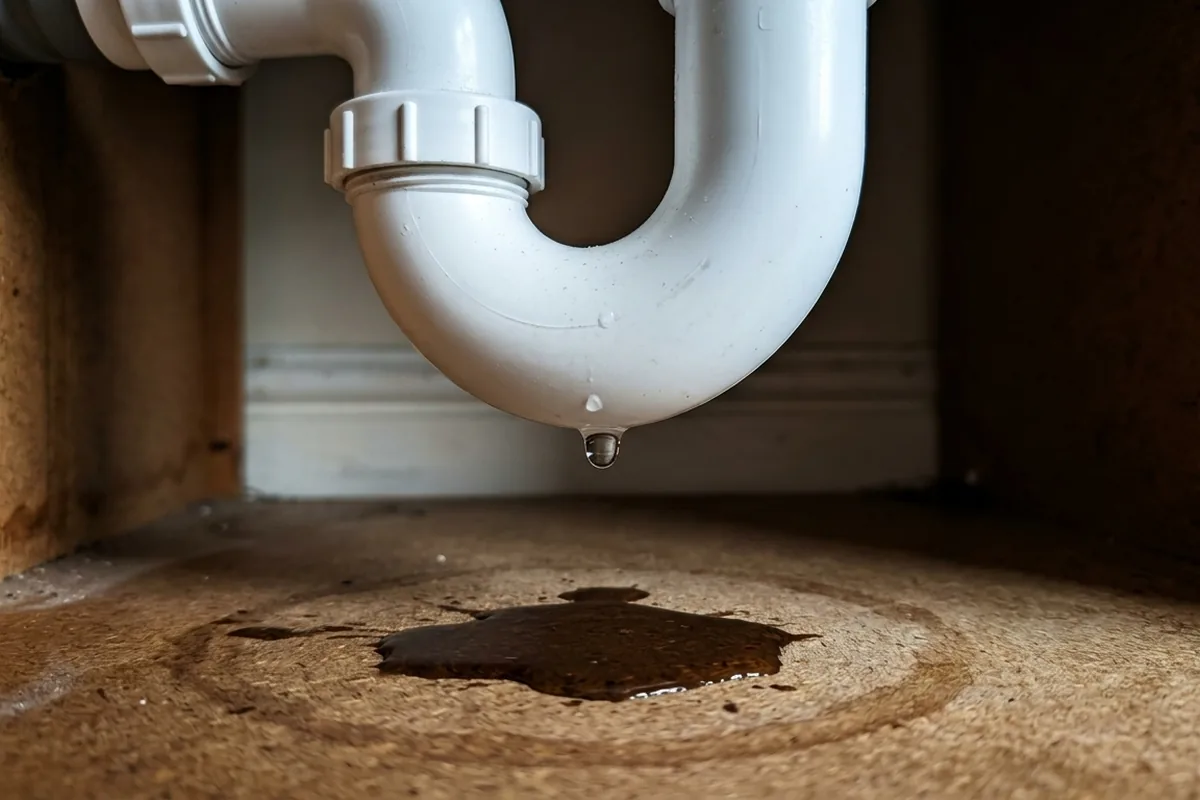
Water getting in at joints
Laminate isn’t the same as proper engineered wood. Regular puddles by a draughty back door, or a leaking washing machine in a utility room, can swell the board edges. Use suitable sealant where the manufacturer allows, and deal with any leaks promptly.
If you’ve already laid the floor and a small area is lifting, sometimes you can remove the beading, take out a few boards, trim them slightly and relay with a better gap. If the lifting is widespread or the concrete underneath is damp, it’s usually time to pause and get proper advice before going any further.
A well-laid laminate floor should feel quiet, flat and slightly “springy” but not bouncy. If you get that finish on day one, and the boards have space to move, you’re unlikely to see those annoying ridges appear when the first cold, damp winter hits.